Git is a popular Version Control System.
A VCS manages versions of code and other documents, and provides services such as:
- authenticate users
- keep a history of all changes to every file, so you can view or checkout any revision of any file(s). Even deleted files can be recovered.
- control who can view, copy, or change files (access control)
- maintain integrity of work (files)
- you cannot overwrite a newer version of a file with work based on an older version
- a new commit must always be based on the current version of what is in the repository
- provides tools for viewing differences between revisions of a file, and see who made the changes
- attribution of who changed what, and a reason for the change (commit message)
- manage multiple versions (branches) of the same collection of files (same project) in parallel, so that teams can work on different features or versions without affecting each other’s work.
- Branches can be merged into a single branch.
Git Basics
Really Good Intro to Git from U. of Washington (PDF)
Presentation: Git Basics
You should know how to use at least these git commands:
| Command | Purpose |
|---|---|
git init |
create a new repository (“repo”) |
git clone |
clone (copy) a remote repo |
git status |
check status and changes |
git add |
stage files for addition or update to repo |
git commit |
commit files to a local repo |
git checkout |
copy one or more files from repo to your working copy |
git mv |
move or rename a file |
git rm |
delete a file from a repo (be careful). -r for recursive. |
git fetch |
pull new work from a remote repo to a local repo |
git pull |
perform git fetch and then git checkout |
git push |
push updates from a local repo to a remote repo |
git ls-files |
list files in your local repo |
You can perform these commands in an IDE, but it is still essential to know how to use the “git” from the command line.
Read: Git Basics, Chapter 2 of the excellent Pro Git Book. (You can download this, too.)
For the lazy: my Git Basics, but Pro Git is better.
Visual Guide to Git:
-
Learn Git Interactive interactive graphical tutorial, includes branch, merge, rebase, and more.
-
Visual Git Reference web page with illustrations of git commands.
Three Areas: Repository, Staging Area (Index), Working Copy
Video: Git Workflow on YouTube explains the 3 areas. Video is from a course at Georgia Tech.
Git uses 3 special areas, and one special reference.
| Area | Meaning |
|---|---|
| local repository | Git repository on your computer |
| staging area | files and changes marked for commit, but not yet committed. Also called the “index”. |
| working copy | the copy of files you work on. The working copy may include files ‘tracked’ by git and untracked files. |
| HEAD | a label that refers to the “commit” your working copy is based on |
Git Q&A
Can you answer these?
- How do you create a local git repository?
- How do you add file “main.py” to the staging area?
- How to show what has been staged for commit?
- How to remove “main.py” from the staging area?
- What happens if you add “main.py” to the staging area, then edit it again? Do you need re re-stage the file?
Fixing Mistakes
- You add
main.pyto the staging area (not committed yet). What command removes if from the staging area? - You make some changes in your working copy of
main.py, but realize your work is wrong. How can you reset your working copy ofmain.pyto the most recent committed to the repo?
Git Best Practices
- Are there any project files you should not commit to a repository?
- How can you avoid accidentally committing some unwanted files to a repo?
- How often should you commit? How to structure commits?
- commit each file whenever you make a change
- commit each file after you change and test it
- files that make up a unit of work should be commited together
- Write descriptive commit comments. The comments should explain what was done and help someone understand the flow of work.
Understanding Git as a Graph
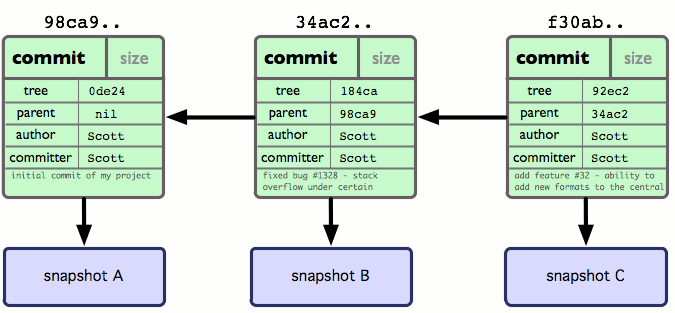
A git repository is structured as a graph. The nodes are commits.
Each commit includes
- id - a hash of the contents
- time stamp
- author name and email
- message describing the commit
- link to previous commit
- link to files in this commit

Each commit (node) refers to previous commits:
Branches and HEAD are just movable labels referring to commits. (This graph also contains tags, “v0.1”, “v1.0”).
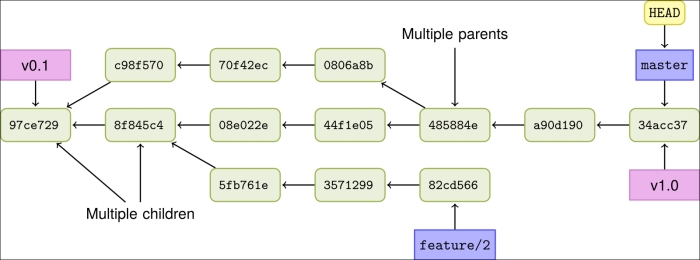
Question: Where is HEAD?
Visualize Git
Git Visualizer type git commands and see a graph of the result!
Learn Git Interactive interactive graphical tutorial, includes branch, merge, rebase, and more.
- You should do the first 2 parts: Intro Sequence and Ramping Up
- Optional: Moving Work Around is useful, too.
Example: View Student Projects using gitk
You can view all branches of a repo using gitk --all.
- Dailigram ISP 2018 project. It has many branches and tags.
The commit messages are not good; later those students asked me to tell your class that commit messages are important! You should write descriptive commit messages.
- Koocook ISP 2019 project, by Mai and friends. Very good use of issues to describe work. They created an organization (KooCook) as umbrella for their work.
- VS Code by Microsoft has hundreds of branches, tags, and project docs in Wiki.
Demo:
- Show the graph of Dailigram. It uses branches and tags.
- Look at all the files in the repo.
- Checkout the first commit using its hash:
git checkout xxxx(How can you find this?) - Files in your working copy have disappeared!
- View gitk again (notice the yellow node)
- Checkout the final commit using its hash:
git checkout xxxx - Working copy now matches final version
- Note: non-tracked files are not affected when you use “checkout”
When you clone a remote repository git only clones
master(by default). You can see references and history of other (remote) branches, but the branch commits are not in your local repo.
To create a “tracking branch” (local branch that connects to a remote branch) use:git branch -t remotes/origin/branch_name
Navigating the Graph
You can move around the graph, checkout or view older commits, view differences, or move the labels!
How to refer to a node (commit):
masteruse the name of a branch or tagaf840bthe first part of commit hash, any number of chars is OKHEADrefers to the commit that your working copy is based onHEAD~(HEAD tilde) means “the predecessor of HEAD”HEAD~2(HEAD tilde 2) means 2 commits before current HEADHEAD^means a parent of HEAD, by default the first parentfoo^1andfoo^2are parents of a commitfoocreated by a merge (commit with 2 parents)v0.1refer to a commit using a label on the commitbugfix~the node before “bugfix”
- what was changed in the most recent commit?
git diff HEAD^ HEAD # to see just the names of changed files: git diff HEAD^ HEAD --name-only - checkout everything from a named commit (this also moves HEAD to that commit)
git checkout 3fa94b - checkout
foo.pyfrom the most recent version in the repo. Useful if you accidentally screw-up or delete a file in your working copy:git checkout -- foo.py - checkout
main.pyfrom the commit before this one (does not change HEAD)git checkout HEAD~ -- main.py - reset “master” to an older commit. For example, reset to previous commit:
git checkout master
git branch -f master HEAD^
Advanced Git Tips for Python Developers has good examples of navigating a git repository and using git stash to save uncommited changes in your working copy.
Github has nice visual tools for showing changes between any commits, but they are only available for the remote on Github – not your local repo.
Git Branches
- Branching and Merging, Ch. 3 of the online [Pro Git Book][Git Book]
- My branch and merge notes
- Merge Practice in class exercise
Branches and Remotes:
- How
git pushhandles branches depends on your configuration:git config --global push.default simple - “sample” is the default behavior in Git 2.0. Other choices are:
simple- push the current branch to upstream, but only if the upstream branch name is exactly the sameupstream- push the current branch to its upstream branch.tracking- old, deprecated alias forupstreammatching- push all matching branches (branches on local that also exist on the remote)
More About Branches and Remotes
- How to use local branches with remotes article has good exmaple of working with branches, such as:
- Push your local branch to remote (creates remote branch):
git push -u origin branch_name - Create a local branch to track a remote:
git checkout -b branch_name origin/branch_name(and then maybegit pullto be sure your branch is up-to-date) - Rename (move) a branch:
git branch -m old_name new_name
- Push your local branch to remote (creates remote branch):
- Git Branch Command Examples commands for 15 common tasks
- How to Clone all Branches?
- This Stackover question explains the problem and soluations.
- Cloning and tracking remotes branches is not done automatically when you clone a repo. You must do it yourself.
Remotes and Github
Remotes, remote branches, and tracking branches.
Exercise on Merging and Conflict Resolution
Using Github presentation and notes
Tags
A tag is a name assigned to a commit, like a bookmark, to make it easy to refer to it later. On Github, tags are used to mark releases of a product.
Git Tags - my notes on how to use tags.
Common Use Cases
Git-tips how to perform common tasks in Git.
- Common use scenarios
- view history of commits
- see what has changed (diffs)
- recover deleted or mangled file
- “undo” staging of files
- “undo” a commit
- checkout a particular commit or a particular file
- work with remotes - push, fetch, pull.
- How to add, change, and view remotes.
- revise a commit, such as adding files you forget
Github Flow
Github Flow is a convention for using Git on a project. Development work is always done on branches, and pull requests used for reviews before merging anything into master. Github Flow is useful for both team and solo projects.
You should know the content of these docs:
- Github Flow Illustrated Guide
- How we Use Github Flow more detailed description by Scott Chacon.
- Scott Chacon describes the rules and steps as:
- Anything on the master branch is deployable.
- For new work, create a descriptive branch off of master, e.g.
payment-auth. - Commit to that branch (locally) and regularly push to the same branch name on the shared repo (Github).
- Open a Pull Request to get help, ask for review & feedback, or request to merge.
- Merge only after a Pull Request review.
- Deploy immediately after review. (I disagree with this.)
Pull Requests
A Pull Request is a request for help, feedback, or review of your work.
In Github Flow, you should always open a Pull Request before merging work from a branch into master. When other people on your team open a Pull Request, you should seriously examine their work and offer feedback, suggestions, and even ciriticisms (“criticize code, not people”).
-
Pull Request Tutorial shows how (and why) to use pull requests on Github. The section “Squash, Rebase, and Cherry Pick” is optional.
-
Commenting on Pull Requests by Github, how to provide useful feedback to a Pull Request.
-
My Slides on Pull Requests - somewhat out-dated.
Optional and useful:
0 Github Branching Convention has nice workflow diagram of using branches in Github flow, but maybe too complex for simple projects.
Specialized Git Uses
- Git Aliases how to create an alias for a git command, such as “git co” alias for “git checkout”.
- Aliases I use:
# co as alias for checkout (as in Subversion)
git config --global alias.co=checkout
# "git amend" as alias for "git commit --amend"
git config --global alias.amend=commit --amend --no-edit
# unstage a file "git unstage filename"
git config --global alias.unstage=reset HEAD --
- Aliases I use:
- Submodules to include another repository inside an existing Git repository tree. Very useful for managing work, such as a separate repo for tests.
Git Command Summary (cheatsheet)
Git Cheatsheet Git commands in a bash shell file
Github Cheatsheet PDF file
Resources
Learn Git:
- Pro Git Book online, Ch. 2 & 3 contain the git essentials.
- Downloadable ProGit book PDF has more material than online book
- Visual Git Reference one page with illustrations of git commands.
- Think Like a Git visually understand how Git works.
Try Git:
- Learn Git Interactive interactive graphical tutorial, includes branch, merge, rebase, and more.
- Visualizing Git interactive tool is view graph of a repository.
Git Details:
- Anatomy of a Git Commit explains what is in a Git “commit”.